

Marking tools help create reference lines, points, centers, circles, and layout guides before cutting, drilling, machining, fitting, or assembly. Learning marking tools names with pictures and uses makes it easier to recognize the different tools used in woodworking, metalworking, sheet-metal work, construction, and general workshop layout.
This guide covers 40 marking tools names with short descriptions and simple recognition clues. The list focuses on tools that create, transfer, locate, or guide marks, along with a few important support tools used during accurate marking out.
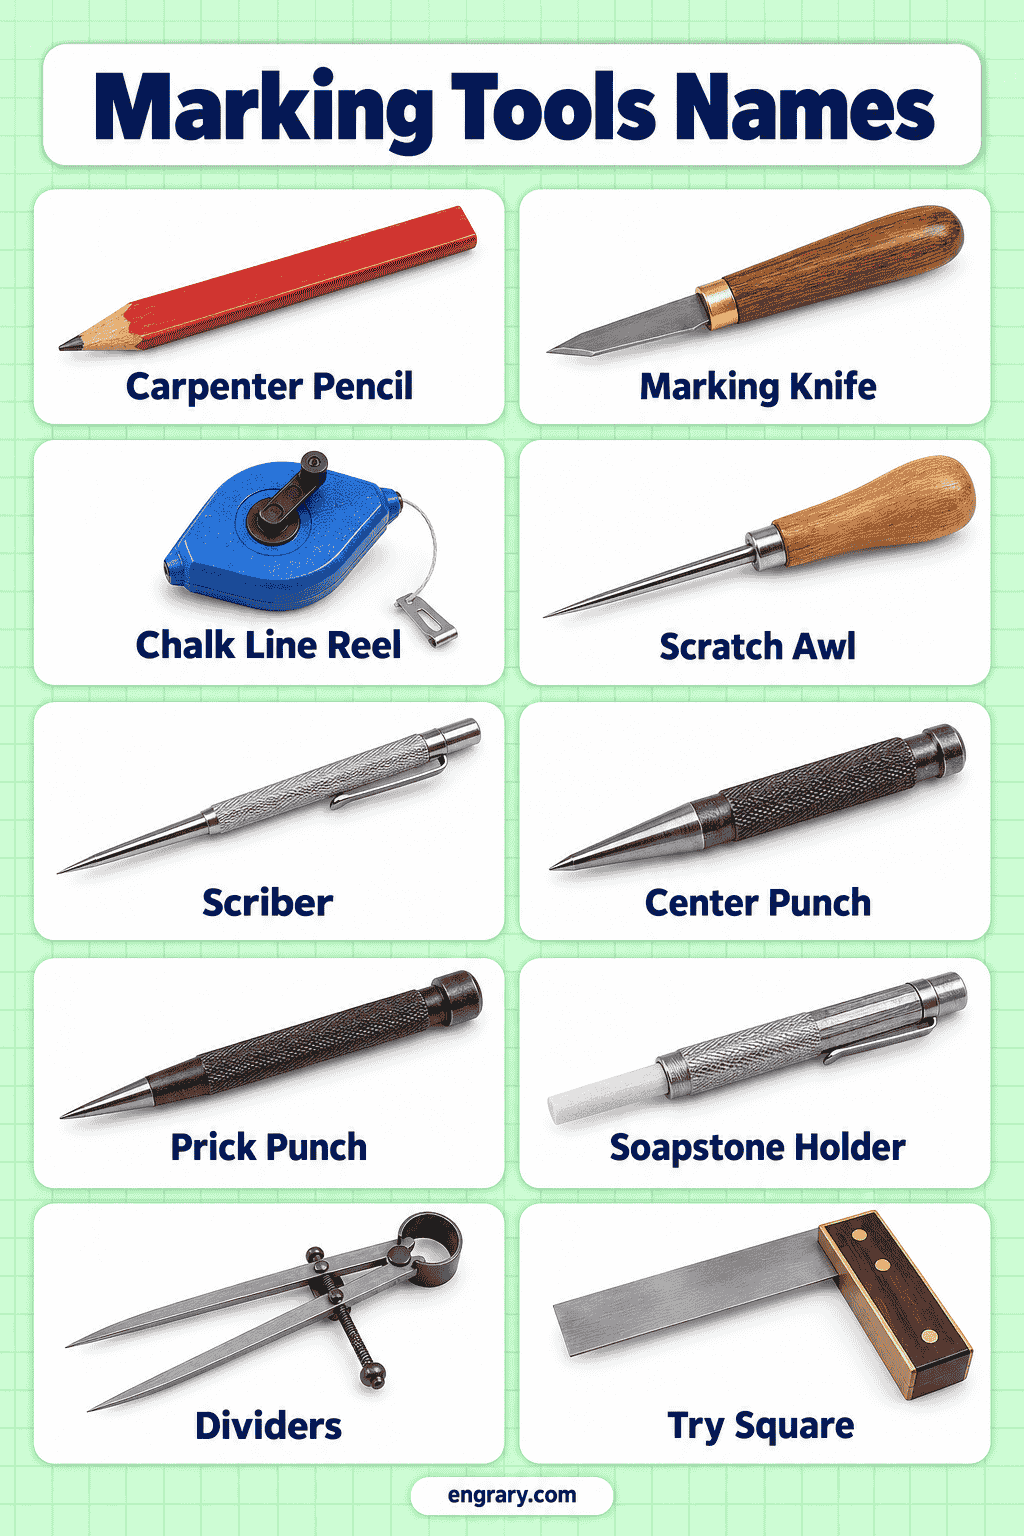
Tools Used During Marking Out
Marking out involves transferring planned dimensions and reference points onto a workpiece before the next stage of work begins. Different tools create different kinds of marks, including scratched lines, pencil lines, punched centers, arcs, and parallel guides.
1. Scriber
A scriber is a slim metal tool with a sharp pointed tip. It scratches fine layout lines onto metal and other hard surfaces.
2. Pocket Scriber
A pocket scriber is a compact scriber designed for easy carrying. It usually has a protected or retractable sharp point.
3. Bent Scriber
A bent scriber has an angled or hooked point that can reach places where a straight scriber is difficult to use.
4. Double-Ended Scriber
A double-ended scriber has a marking point at each end, often with different tip shapes for varied layout work.
5. Marking Knife
A marking knife has a narrow sharp blade that creates fine layout lines, especially on wood.
6. Carpenter Pencil
A carpenter pencil has a broad, flat body and thick lead. Its shape helps it make visible marks on wood and rough construction surfaces.
7. Marking Pencil
A marking pencil is used to draw visible layout lines on wood, boards, and other work surfaces.
8. Chalk Line
A chalk line consists of a reel containing a chalk-coated cord. When stretched and snapped, it leaves a long straight reference line.
9. Lumber Crayon
A lumber crayon has a thick wax-like marking core designed for visible marks on wood and rough materials.
10. Paint Marker
A paint marker uses paint-based ink to create bold marks on metal, wood, plastic, and other surfaces.
11. Prick Punch
A prick punch is a short steel tool with a fine pointed end. It creates small indentations that identify layout points.
12. Center Punch
A center punch has a stronger conical point that produces a deeper indentation at the center of a planned hole.
13. Dot Punch
A dot punch creates small visible indentations along marked lines or at reference locations.
14. Automatic Center Punch
An automatic center punch has a spring-loaded internal mechanism that creates a center mark without a separate hammer.
15. Transfer Punch
A transfer punch is a straight precision punch used to transfer the center location of an existing hole onto another surface.
16. Divider
A divider has two pointed legs joined at a pivot. It marks circles and arcs or transfers spacing between two points.
17. Wing Divider
A wing divider includes an adjustment mechanism that helps hold the distance between its pointed legs.
18. Compass
A compass has two pivoted legs, typically with one point and one marking element, for drawing circles and arcs.
19. Wing Compass
A wing compass includes an adjustable wing mechanism that controls and holds the radius more securely.
20. Trammel
A trammel is used to mark larger circles and arcs that are beyond the practical range of an ordinary divider or compass.
21. Trammel Points
Trammel points are two adjustable marking heads fitted along a beam or bar to create large-radius circles and arcs.
22. Marking Gauge
A marking gauge has a beam, adjustable fence, and marking point. It creates a line parallel to the edge of a workpiece.
23. Pin Marking Gauge
A pin marking gauge uses a pointed metal pin to scratch a parallel line along wood.
24. Cutting Gauge
A cutting gauge uses a small knife-like blade instead of a pin, producing a cleaner scored line.
25. Wheel Marking Gauge
A wheel marking gauge uses a small circular cutting wheel at the end of its beam.

Tools for Marking Straight Lines and Layout References
Straight-line marking tools help establish clear references before cutting or fitting. They are especially important when a layout needs to remain easy to see across a larger surface.
26. Chalk Reel
A chalk reel is the enclosed housing that stores the chalk line and allows the cord to be rewound after use.
27. Layout Marker
A layout marker is a workshop marker designed to leave visible reference lines or points on work surfaces.
28. Soapstone Marker
A soapstone marker uses a soft mineral marking stick that leaves visible lines on metal and other workshop materials.
Punches for Point and Center Marking
Punches create physical indentations rather than drawn or scratched lines. These small marks help identify exact points during layout work.
29. Bell Punch
A bell punch has a self-centering body designed to locate and mark the center of circular holes or openings.
30. Spring Punch
A spring punch uses internal spring force to create a small indentation without requiring a hammer.
Marking Gauges for Parallel Lines
Marking gauges are especially useful when a line must remain a fixed distance from an edge. Their fences slide against the workpiece while the marking point or blade creates the layout line.
31. Mortise Gauge
A mortise gauge has two marking points that create two parallel lines at the same time.
32. Panel Gauge
A panel gauge has a longer beam than a standard marking gauge, allowing parallel lines to be marked farther from an edge.
33. Combination Marking Gauge
A combination marking gauge combines more than one marking function, such as single-line and paired-line layout.
Tools for Marking Circles, Arcs, and Large Radii
Circular layout requires tools that maintain a fixed radius around a center point. Small tools suit short radii, while trammel systems handle much larger circles.
34. Beam Compass
A beam compass uses two movable heads mounted on a rigid beam to mark larger circles and arcs accurately.
35. Circle Scriber
A circle scriber is designed to scratch circular lines onto harder surfaces using a fixed center and adjustable radius.
Squares and Guides Used for Layout Marking
Some tools do not create a mark by themselves but provide a reliable edge or angle for guiding a pencil, knife, or scriber.
36. Try Square
A try square has a fixed blade and stock set at 90 degrees. It guides right-angle layout lines.
37. Combination Square
A combination square has an adjustable head fitted to a graduated rule. It guides 90-degree and 45-degree layout lines.
38. Sliding Bevel
A sliding bevel has an adjustable blade that can copy and transfer an existing angle onto another workpiece.
Marking-Out Reference and Support Tools
Accurate marking often depends on stable reference surfaces and work-holding supports. These tools help position workpieces correctly while marks are created.
39. Surface Gauge
A surface gauge has a heavy base, upright post, and adjustable scriber. It marks lines at a controlled height from a reference surface.
40. Surface Plate
A surface plate is a flat reference surface used to support accurate measuring and marking-out work.

Marking Tools That Are Easy to Confuse
Several marking tools look similar or perform related layout jobs. Their marking point, blade, fence, or adjustment mechanism usually provides the clearest difference.
| Tools | Main Difference |
|---|---|
| Scriber vs Marking Knife | A scriber scratches hard surfaces with a pointed tip, while a marking knife cuts a fine line mainly in wood. |
| Scriber vs Permanent Marker | A scriber creates a physical scratch, while a marker leaves an ink line on the surface. |
| Prick Punch vs Center Punch | A prick punch makes a finer layout indentation, while a center punch makes a deeper center mark. |
| Center Punch vs Automatic Center Punch | A standard center punch normally requires an external strike, while an automatic version uses an internal spring mechanism. |
| Divider vs Compass | A divider usually has two pointed legs, while a compass generally uses one point and one marking element. |
| Divider vs Trammel | A divider suits smaller radii, while a trammel handles much larger circles and arcs. |
| Marking Gauge vs Cutting Gauge | A marking gauge normally uses a pin, while a cutting gauge uses a small blade. |
| Marking Gauge vs Mortise Gauge | A marking gauge creates one parallel line, while a mortise gauge can create two parallel lines. |
| Pin Marking Gauge vs Wheel Marking Gauge | A pin gauge scratches with a point, while a wheel gauge cuts with a small circular wheel. |
| Surface Gauge vs Marking Gauge | A surface gauge works from a flat reference surface, while a marking gauge follows the edge of the workpiece. |
| Try Square vs Combination Square | A try square has a fixed right-angle blade, while a combination square has an adjustable head and multiple layout functions. |
Alternate Names for Marking Tools
Marking terminology varies between trades, countries, and manufacturers. Learning common alternate names makes workshop vocabulary easier to understand.
| Main Name | Alternate Name |
|---|---|
| Marking Tools | Marking-Out Tools |
| Scriber | Scribing Tool |
| Marking Gauge | Scratch Gauge |
| Mortise Gauge | Mortice Gauge |
| Wheel Marking Gauge | Wheel Gauge |
| Chalk Line | Chalk Reel |
| Carpenter Pencil | Carpenter’s Pencil |
| Surface Gauge | Scribing Block in some contexts |
| Automatic Center Punch | Automatic Punch |
| Trammel Points | Beam Compass Points |
Alternate names should not be counted as separate tools when they refer to the same or closely related item.
Frequently Asked Questions
Common marking tools include scribers, carpenter pencils, chalk lines, marking knives, center punches, prick punches, dividers, marking gauges, mortise gauges, and surface gauges.
A scriber has a sharp pointed tip that scratches layout lines onto harder surfaces such as metal. A marking knife uses a blade to cut a fine reference line, especially on wood.
A prick punch produces a smaller, finer indentation for locating layout points. A center punch produces a deeper mark that clearly identifies the center of a planned hole.
Dividers, compasses, wing dividers, trammels, trammel points, beam compasses, and circle scribers are commonly used for circular and curved layout work.
A marking gauge usually creates one line parallel to an edge. A mortise gauge uses two marking points to create two parallel lines for wider layout work.
You May Also Like



Leave a Comment